NSAttributedStringを使うと文字列を装飾して描画することができます。
使いたい属性をNSDictionaryに設定して、NSAttributedStringのインスタンスを生成することで属性付きの文字列を使うことができます。
後から属性を追加したり変更する場合は、NSMutableAttributedStringの方を使います。
NSAttributedString UIKit Additions Referenceを見るとiPhoneで使える属性として以下のようなものがあるようです。
NSString *const NSFontAttributeName;                             // フォント名
NSString *const NSParagraphStyleAttributeName;           // 段落の書式
NSString *const NSForegroundColorAttributeName;        // 文字色
NSString *const NSBackgroundColorAttributeName;        // 背景色
NSString *const NSLigatureAttributeName;                       // リガチャ
NSString *const NSKernAttributeName;                             // カーニング
NSString *const NSStrikethroughStyleAttributeName;     // 取り消し線
NSString *const NSUnderlineStyleAttributeName;            // 下線
NSString *const NSStrokeColorAttributeName;                // 枠線の色
NSString *const NSStrokeWidthAttributeName;                // 枠線の幅
NSString *const NSShadowAttributeName;                       // 影
NSString *const NSVerticalGlyphFormAttributeName;      // 縦書き
一通り試してみます。
フォント名
NSString *text = @"国境の長いトンネルを抜けると雪国であった。";
UIFont *font = [UIFont fontWithName:@"HiraKakuProN-W6" size:20.f];
NSAttributedString *str = [[NSAttributedString alloc]
                           initWithString:text
                           attributes:@{NSFontAttributeName:font}];
[str drawInRect:CGRectMake(0, 0, 200, 100)];

指定した幅に収まらない場合は自動的に折り返されています。
フォントを指定しないと、デフォルトは、Helveticaの12ポイントになるそうです。
段落の書式
NSMutableParagraphStyle *style = [[NSParagraphStyle defaultParagraphStyle] mutableCopy];
[style setAlignment:NSTextAlignmentCenter];
NSAttributedString *str = [[NSAttributedString alloc] initWithString:text
                                                          attributes:@{NSParagraphStyleAttributeName:style}];
[str drawInRect:CGRectMake(0, 0, 200, 100)];
指定した幅の範囲でセンタリングされました。
段落の書式としては他に、左寄せや右寄せ、改行の種類、1行目や2行目以降のインデント、行間、行の高さ、段落間の空き等の設定ができます。
文字が小さいのでフォントも一緒に指定してみます。
NSMutableParagraphStyle *style = [[NSParagraphStyle defaultParagraphStyle] mutableCopy];
[style setAlignment:NSTextAlignmentCenter];
NSAttributedString *str = [[NSAttributedString alloc]
                           initWithString:text
                           attributes:@{NSParagraphStyleAttributeName:style,
                                                  NSFontAttributeName:font}];
[str drawInRect:CGRectMake(0, 0, 200, 100)];

文字色
NSAttributedString *str = [[NSAttributedString alloc]
                           initWithString:text
                           attributes:@{NSForegroundColorAttributeName:[UIColor blueColor],
                           NSFontAttributeName:font}];
CGSize size = [str size];
[str drawInRect:CGRectMake(0, 0, size.width, size.height)];
一行に収まるように必要な描画サイズを取得するようにしました。
背景色
NSAttributedString *str = [[NSAttributedString alloc]
                           initWithString:text
                           attributes:@{NSBackgroundColorAttributeName:[UIColor redColor],
                           NSFontAttributeName:font}];
CGSize size = [str size];
[str drawInRect:CGRectMake(0, 0, size.width, size.height)];
リガチャ
リガチャは日本語だと意味が無さそうなので、英語で試してみます。
NSAttributedString *str = [[NSAttributedString alloc]
                           initWithString:@"Affine"
                           attributes:@{
                           NSFontAttributeName:[UIFont fontWithName:@"Verdana-Bold" size:30.f]}];
[str drawInRect:CGRectMake(0, 100, 400, 100)];
str = [[NSAttributedString alloc]
                           initWithString:@"Affine"
                           attributes:@{NSLigatureAttributeName:@1,
                           NSFontAttributeName:[UIFont fontWithName:@"Verdana-Bold" size:30.f]}];
[str drawInRect:CGRectMake(0, 150, 400, 100)];
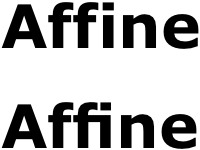
上がリガチャ無しで、下がリガチャ有りです。
リガチャを指定すると隣り合ったfとiが繋がって描画されています。
現状、iOSでは、1(デフォルトのリガチャを有効にする)しか使えないみたいです。(OSXでは、2「全てのリガチャを有効にする」も設定可能)
また、何が原因か分りませんが、ビットマップコンテキストへの描画ではリガチャの指定が反映されませんでした。
カーニング
NSAttributedString *str = [[NSAttributedString alloc]
                           initWithString:text
                           attributes:@{NSKernAttributeName:@18.0,
                           NSFontAttributeName:font}];
CGSize size = [str size];
[str drawInRect:CGRectMake(0, 0, size.width, size.height)];
文字間の幅が空いていますね。
取り消し線
NSAttributedString *str = [[NSAttributedString alloc]
                           initWithString:text
                           attributes:@{NSStrikethroughStyleAttributeName:[NSNumber numberWithInteger:NSUnderlineStyleSingle],
                           NSFontAttributeName:font}];
CGSize size = [str size];
[str drawInRect:CGRectMake(0, 0, size.width, size.height)];
下線
NSAttributedString *str = [[NSAttributedString alloc]
                           initWithString:text
                           attributes:@{NSUnderlineStyleAttributeName:[NSNumber numberWithInteger:NSUnderlineStyleSingle],
                           NSFontAttributeName:font}];
CGSize size = [str size];
[str drawInRect:CGRectMake(0, 0, size.width, size.height)];
枠線
NSAttributedString *str = [[NSAttributedString alloc]
                           initWithString:text
                           attributes:@{NSStrokeColorAttributeName:[UIColor blueColor],
                           NSStrokeWidthAttributeName:@5.0,
                           NSFontAttributeName:font}];
CGSize size = [str size];
[str drawInRect:CGRectMake(0, 0, size.width, size.height)];
NSStrokeColorAttributeNameで色を指定し、NSStrokeWidthAttributeNameで枠線の幅を指定しています。
影
NSShadow *shadow = [[NSShadow alloc] init];
shadow.shadowOffset = CGSizeMake(1.f, 1.f);   // 影のサイズ
shadow.shadowColor = [UIColor redColor];      // 影の色
shadow.shadowBlurRadius = 5.f;                // ぼかしの半径
NSAttributedString *str = [[NSAttributedString alloc]
                           initWithString:text
                           attributes:@{NSShadowAttributeName:shadow,
                           NSFontAttributeName:font}];
CGSize size = [str size];
[str drawInRect:CGRectMake(0, 0, size.width, size.height)];
縦書き
NSAttributedString *str = [[NSAttributedString alloc]
                           initWithString:text
                           attributes:@{NSVerticalGlyphFormAttributeName:@1,
                           NSFontAttributeName:font}];
CGSize size = [str size];
[str drawInRect:CGRectMake(0, 0, size.width, size.height)];
ダメですね。どうやらiOSではまだ縦書きの設定はできないようです。ただ、最後の「。」だけ何故か影響を受けてるようです。ん〜なんでだろう。
ごちゃ混ぜ
1つの文字列の異なる部分に異なる属性を設定することも出来ます。
    NSMutableAttributedString *str = [[NSMutableAttributedString alloc] initWithString:text];
    /* 全体にフォントを適用 */
    [str addAttribute:NSFontAttributeName
                value:[UIFont fontWithName:@"HiraMinProN-W3" size:20.f]
                range:NSMakeRange(0, text.length)];
    /* 一部の範囲に別のフォントを上書きで適用 */
    [str addAttribute:NSFontAttributeName
                value:[UIFont fontWithName:@"STHeitiTC-Medium" size:40.f]
                range:NSMakeRange(3, 6)];
    /* 黄色の文字色 */
    [str addAttribute:NSForegroundColorAttributeName
                value:[UIColor yellowColor]
                range:NSMakeRange(0, 5)];
    /* 打ち消し線 */
    [str addAttribute:NSStrikethroughStyleAttributeName
                value:[NSNumber numberWithInteger:NSUnderlineStyleSingle]
                range:NSMakeRange(10, 3)];
    /* 青の背景色と白の文字色 */
    [str addAttributes:@{NSBackgroundColorAttributeName:[UIColor blueColor],
                                    NSForegroundColorAttributeName:[UIColor whiteColor]}
                 range:NSMakeRange(14, 2)];
    /* 赤の枠線と下線 */
    [str addAttributes:@{NSStrokeColorAttributeName:[UIColor redColor],
NSStrokeWidthAttributeName:@2.0,
NSUnderlineStyleAttributeName:[NSNumber numberWithInteger:NSUnderlineStyleSingle]}
                 range:NSMakeRange(17, 3)];

CGSize size = [str size];
[str drawInRect:CGRectMake(0, 0, size.width, size.height)];
1つの属性を追加するときは、addAttributeメソッドを、複数の属性を追加する場合は、addAttributesメソッドを使います。
NSAttributedStringの比較
NSAttributedStringのisEqualメソッドは、文字列の内容だけでなく、属性の値も比較して同じかどうかを判断します。
NSAttributedString *a = [[NSAttributedString alloc]
                           initWithString:text
                           attributes:@{NSFontAttributeName:[UIFont fontWithName:@"Helvetica" size:20.f]}];
NSAttributedString *b = [[NSAttributedString alloc]
                           initWithString:text
                           attributes:@{NSFontAttributeName:[UIFont fontWithName:@"Helvetica" size:20.f]}];
NSAttributedString *c = [[NSAttributedString alloc]
                           initWithString:text
                           attributes:@{NSFontAttributeName:[UIFont fontWithName:@"Helvetica" size:21.f]}];
NSAttributedString *d = [[NSAttributedString alloc]
                           initWithString:text
                           attributes:@{NSFontAttributeName:[UIFont fontWithName:@"Courier" size:20.f]}];
[a isEqual:b];           // True
[a isEqual:c];           // False
[a isEqual:d];           // False
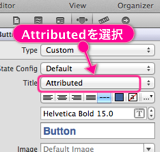
UI要素にNSAttributedStringを使う
NSAttributedStringはこの様に直接描画する他に、UILabelやUIButtonのタイトル文字列として設定することもできます。
NSAttributedString *str = [[NSAttributedString alloc]
                           initWithString:@"Push!"
                           attributes:@{NSStrokeColorAttributeName:[UIColor blueColor],
                           NSStrokeWidthAttributeName:@5.f}];
[self.button setAttributedTitle:str forState:UIControlStateNormal];

また、基本的な属性はXcodeのストーリーボード上で直接設定することもできます。